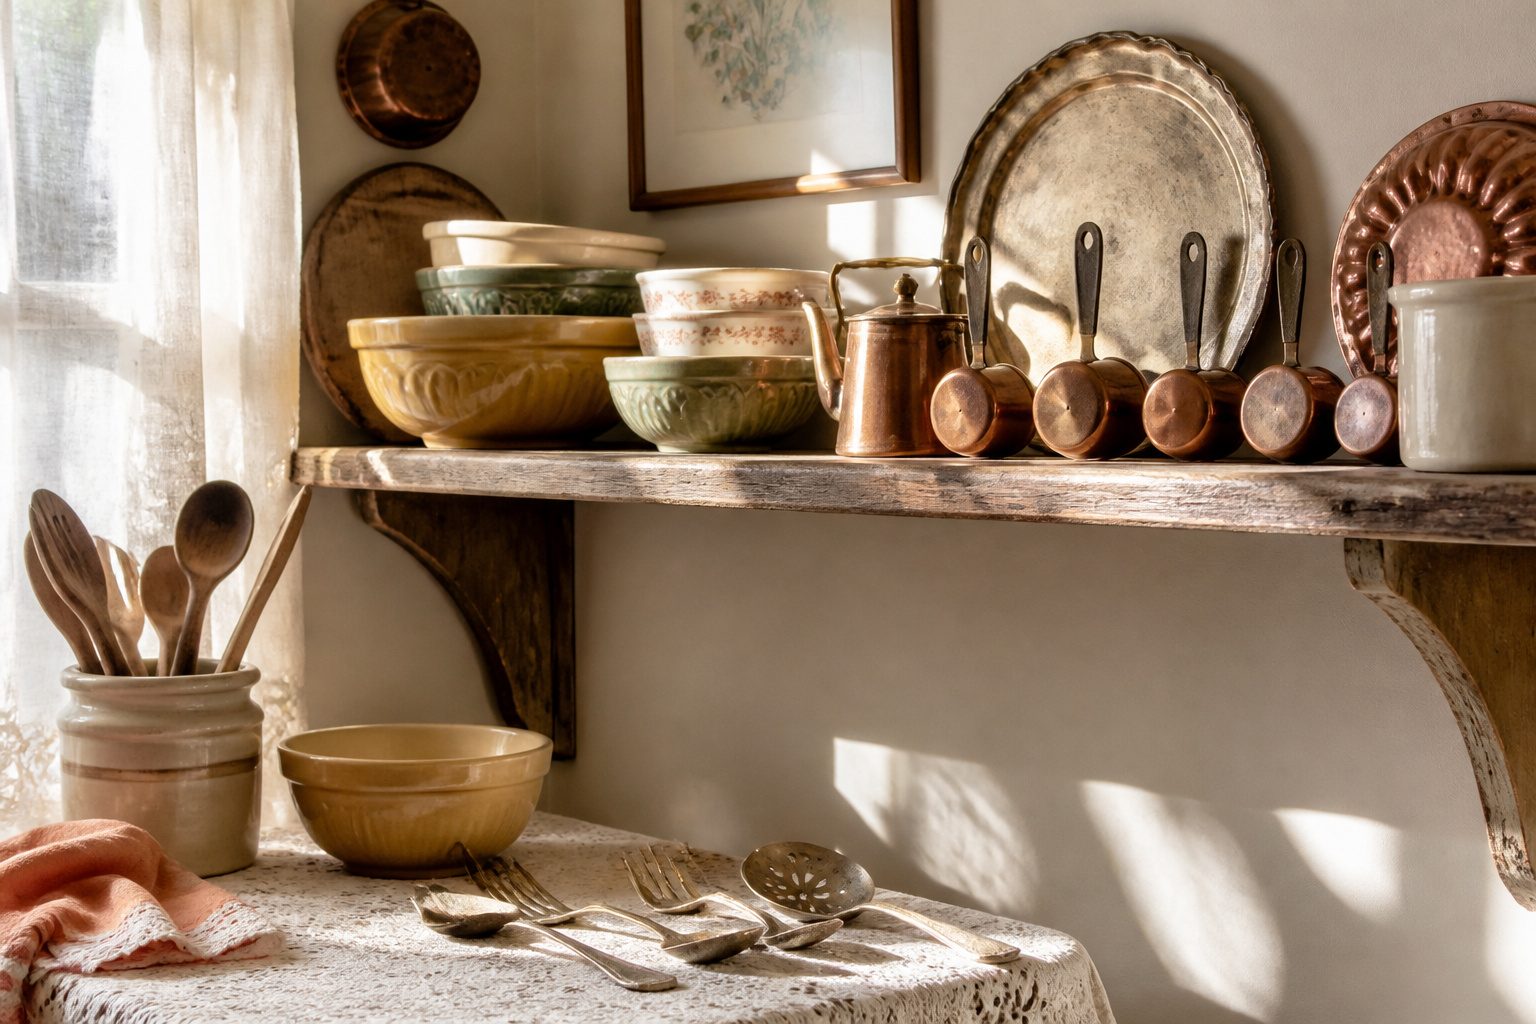
Vintage kitchen utensils work in every home, but only if you match the display method to how you actually cook.
A brass rail above the stove puts daily tools within reach, while a shadow box for cookie cutters suits the pieces you never touch.
The difference between curated and cluttered usually comes down to one detail most people skip: leaving gaps between items so each piece gets seen.
A 6-inch ledge keeps handles from jutting into your workspace, and that tighter profile reads as intentional display rather than improvised storage.
1. Open Shelving

Closed cabinetry can make a kitchen feel sterile, and open storage makes the space feel lived in and instantly more inviting, as Dan Mazzarini of BHDM Design puts it.
That shift in feel is exactly why open shelving works so well for vintage utensils you actually use; the patina and wear become part of the room’s warmth rather than something hidden away.
For renters who cannot tear out upper cabinets, this is one of the few real upgrades within reach.
A wall-mounted L-shape shelf needs only a drill and the right anchors, and it leaves no trace beyond a few holes that spackle covers in ten minutes.
Depth matters more than most people account for: plates and bowls need the full span to sit securely, while utensils sit happily on a shallower ledge, 6 inches or so, that keeps handles from jutting into your workspace.
The tighter profile also reads as intentional display rather than improvised storage.
The choice between uniform serveware and an eclectic mix is yours, though I lean toward the mix for vintage pieces.
A row of identical factory spoons looks staged; three different eras of wooden spoons and a hand-wired whisk look like a collection someone built over time.
Helen Parker at deVOL makes the practical case: why keep ornaments out and the things you use behind closed doors?
The utensils earn their spot when you have chosen them with love, as she puts it, and when they are the ones you reach for daily.

Elegant Vase Design with Non-slip Mat: Compared to other standard designs, our kitchen utensil holder for countertop features a unique pitcher-shaped design, "Wabi-Sabi" white color, The bottom of the rustic utensil holder features non-slip mat to stable placement. It offering a rustic farmhouse aesthetic. This rustic kitchen utensil holder measures 7.6in/19.5cm tall with a 4.9in/12.5cm wide opening, perfectly sized to keep spatulas, spoons, ladles and everyday cooking tools neatly organized while your countertop stays clutter-free

🍴 LARGE CAPACITY FOR 10-15 UTENSILS – Spacious ceramic utensil holder keeps wooden spoons, spatulas, whisks, ladles and everyday cooking tools organized and easy to reach on your kitchen counter.

COMPACT SIZE & KITCHEN ISLAND: This multi tier storage cart is expertly engineered with a compact design to fit small spaces or your pantry storage area; features a vintage wooden table top that transforms into a premium coffee station or preparation counter
2. Utensil Rails

A brass hanging rod mounted above the oven or countertop turns copper pots, vintage strainers, and heirloom ladles into immediate decor.
S-hooks do the actual work here: they let you space pieces so each one gets seen, and they put the tool you need at hand without opening a cabinet.
Rail types run from simple wall-mounted bars to ceiling-hung wire racks. The wall-mounted kind, like the DeVol brass rod, suits renters better because it carries less weight and creates fewer holes to patch later.
A ceiling rack holds more, but it needs joist support and a stud finder, which pushes the project past a single afternoon.
For the weekend-project crowd, this beats pegboard on two counts. First, the rail itself reads as intentional design rather than garage storage.
Second, you are not locked into a grid of holes; you slide an S-hook left or right until the balance looks right, then swap a pot for a colander when the season changes. You give up some weight capacity.
A loaded rail above the oven puts steam and grease on display pieces, so I hang the workhorse pans there and keep the polished copper slightly farther out over open counter where the air moves cleaner.

【Decorative】 The kitchen utensil hanger comes in beautiful quality and color, simple and stylish, adding an elegant look to your space.

【HANGING POT RACK WITH ADJUSTABLE S HOOKS】The hanging pots and pans rack comes with 1 tube, 2 wall brackets, 1 connecting bracket, 8 S hooks and screws. ROTHLEY pots and pans hanging rack will bring you one a neat and tidy kitchen setting. You can adjust the distance between hooks, the sliding hooks won't fall and can be moved around for optimum placement.

【Robust Stainless Steel Build】Constructed from high - quality stainless steel, these 8 S - hooks are durable and resistant to corrosion. They can bear the weight of pans, pots, and other heavy items without bending or breaking.
3. Glass-Fronted Cabinets

Glass-fronted cabinets split the difference between open shelving and solid doors, which is why they work so well for vintage utensils you actually use.
You see the shape of your copper strainers or ceramic crocks without wiping grease off them every month. Fred Horlock at Neptune puts it plainly: this setup keeps pieces protected and accessible at the same time.
If your current cabinets have solid inserts, replacing just the panel with glass or applying a clear film runs a fraction of what new cabinetry costs, and you keep the existing frames.
Film is the cheaper route but reads slightly cloudier; actual glass reads cleaner and lasts longer. Either way, the cabinet does the dust-blocking that open shelving cannot, while still giving you the display moment that solid doors hide completely.

Dimensions: This wall mounted kitchen rail measures 22 inches/55.2 centimeters in length, 2.8 inches/71 centimeters in width, and 2 inches/5 centimeters in height. It comes with five detachable hooks and is suitable for easy installation in various parts of the home

Vintage Mental Build: crafted from solid iron with a stunning antique brass and gold finish, this kitchen rail combines industrial durability with timeless vintage elegance; The sleek metallic sheen adds a sophisticated, professional touch to any kitchen, cafe, or restaurant decoration

【HANGING POT RACK WITH ADJUSTABLE S HOOKS】The hanging pots and pans rack comes with 1 tube, 2 wall brackets, 1 connecting bracket, 8 S hooks and screws. ROTHLEY pots and pans hanging rack will bring you one a neat and tidy kitchen setting. You can adjust the distance between hooks, the sliding hooks won't fall and can be moved around for optimum placement
4. Wooden Cutting Boards
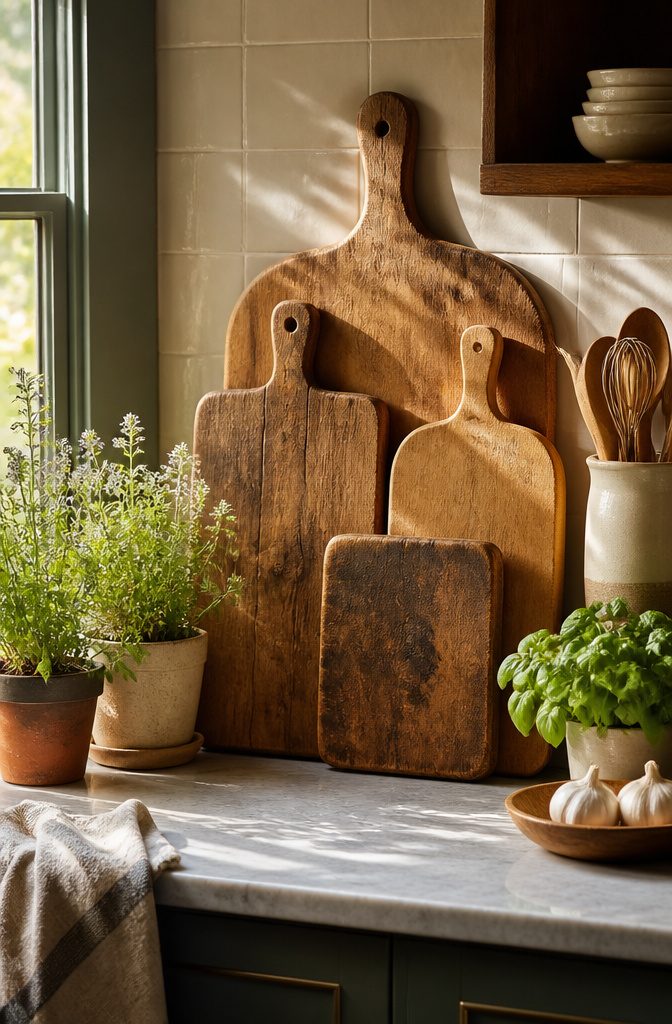
Wooden cutting boards read as vintage in two shapes that are easy to spot and easy to find. The breadboard style carries a narrow handle with a hole for hanging, often darker at the edges from years of use.
French country boards run wider and heavier, sometimes with a faint curve along one side that came from being hand-planed.
I keep one of each out on my counter, and the mix of widths does more than matching sizes ever could.
The cluttered look starts at three boards. Two leaning against a backsplash look intentional; four look like storage you forgot to put away.
I stack mine upright, the tallest in back, with an inch of the smaller board showing above the counter line so the silhouette steps down.
This also hides an outlet without the obvious flatness of a plate leaned there for cover.
A thick chopping block earns its counter space by weight alone. Set it toward the front edge where you actually reach for it, not pushed against the wall where it becomes a backdrop.
The boards you use daily stay within arm’s length; the ones that are mostly for show go higher or deeper in the stack.

1.High-Quality Material: A high-value and practical three piece biscuit mold storage box, this organizer is both durable and aesthetically pleasing, ensuring long-lasting use.Each set comes with a board of stickers and a pen.

Durable Material: Made from high-strength, crystal-clear ABS that resists warping over time. Each cookie cutter storage box comes with custom stickers and a pen, making it easy to sort and identify your baking tools at a glance.

The gift box cookie cutter set includes four different sizes: 5", 4", 3", and 2". Each cutter has a 1" deep cut and is suitable for cutting dough, fondant or craft clay. Wouldn't it be amazing to get a gift in the shape of a gift box?
5. Decorative Glassware

Glassware collects light in a way pottery never manages, which is why the shelf needs to face a window or sit under a pendant for the display to earn its keep.
I group by color first, not era; three amber pieces read as intentional where one amber, one green and one clear just read as clutter.
Function matters less than you’d think—a juice glass and a dessert coupe from the same decade sit together fine if the hue matches.
Mismatched sets win over matched ones every time. A full set of twelve Depression glasses feels like a museum case, but five odd pieces with similar ridges or stems tell a story of Saturdays at estate sales.
The gaps between them let light through, and that transparency is exactly why you chose glass over ceramic for this particular shelf.
Height variation keeps the eye moving.
I put the tallest tumbler at the back and let a low sherbet glass catch the light up front. Without that step, the whole row goes flat and the vintage quality disappears into a single block of color.

【Make Everything Organized】This 4pack clear drawer organizer set (15" x 6" x 2" each) neatly stores spatulas, ladles, whisks, knives, forks, and more. Maximize Kitchen drawer space and keep everything tidy and easy to find.

【CUTLERY TRAY】Different sizes solve your cutlery storage, spoons, knives, forks have their own exclusive location.This series of drawer organizer fits your life exactly the way you want it.

Unique design creates more space in your drawer
6. Vintage Vases for Utensils

A standard utensil crock sits there doing one job. A vase does two, and the swap takes about ten seconds.
The shape matters more than the pattern. A wide mouth and a heavy base keep wooden spoons from tipping the whole thing over when you grab one in a hurry.
A flared rim helps, straight sides hurt. I have watched a narrow-necked bud vase go over with a single slotted spoon; the physics do not forgive that.
Ceramic with a little crazing, a vintage glass milk container, a retro jam jar cleaned of its label, all of these read as collected rather than bought as a set.
The utensils you choose complete the look. Spoons and spatulas with some length to them, maybe 10 to 12 inches, spill out in a way that shorter tools do not.
They catch light and cast small shadows against the backsplash. A whisk or two adds height variation without looking arranged.
Color runs the same way. Blue mason jars against white cabinetry give a pastel note; warm wood tones against cooler ceramic feel cottage rather than farmhouse.
Thrift stores and garage sales are where these pieces live, so the cost stays low and the match to your kitchen stays exact.
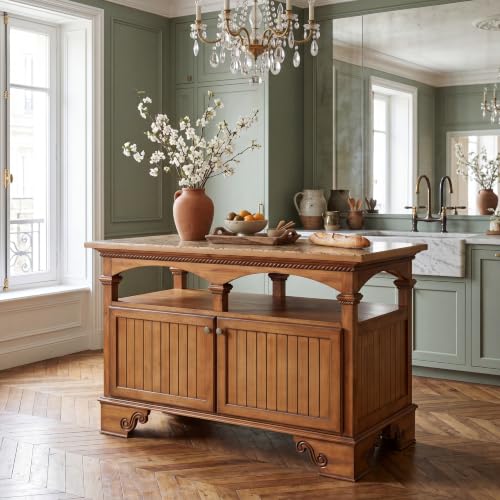
Vintage Farmhouse Kitchen Island: Rope-inspired trim, arched cutouts, turned spindle accents, beadboard-style cabinet doors and carved bracket feet give this 47-inch kitchen island a distinctive vintage profile for kitchens, dining rooms and home bars.

Ample storage space: Our 6-tier bookshelf provides ample storage area for all of your belongings, whether it's books, family photos, frames, devices, utensils, or plants. Overall size: 31.5 * 12.9 * 78.3 inches (L * D * H). The compartment height is about 14.3"

【Stable Anti-slip Performance】The drawer liner's textured surface firmly holds dishes, containers, and utensils in place, preventing sliding and shifting during frequent drawer use, keeping items organized.
7. Hanging Plates

Some plates are too good to hide in a cabinet. Wire hangers let them float like artwork on the wall, which is the move if you want a gallery feel without framing anything.
The alternative is adhesive discs, and that is the renter’s play: no holes, no spackle later, just a disc rated for the weight of your piece.
Check that rating. A china plate and a stoneware dinner plate are not the same load.
Plate walls fail when they look like a restaurant. The fix is irregular spacing and mixed sizes.
Start with one piece you actually like, build outward slowly, and stop before the arrangement wraps a whole room. Family heirlooms work here because the story shows in the glaze, not in a label.
Open shelving is the other route if your walls are already busy or if you use the pieces seasonally, though shelves collect dust faster than hangers collect attention.
For a weekend project, hangers win on speed.
Discs win on deposit safety. Either way, the plate does the work; your job is giving it wall space that reads personal, not commercial.

PREMIUM BRASS MATERIAL: DaylyFav S Hook made from high-quality H62 brass (non-magnetic - test with magnet to verify authenticity). Corrosion-resistant and rust-proof with 15 lbs load capacity, suitable for kitchens, bathrooms, and closets without breaking or rusting like iron alternatives

【Decorative】 The kitchen utensil hanger comes in beautiful quality and color, simple and stylish, adding an elegant look to your space.

100% SOLID COPPER BRASS CONSTRUCTION – Not brass-plated iron (non-magnetic, test with a magnet to verify authenticity). Rust-proof and corrosion-resistant, holding up to 15 lbs for secure use in kitchens, bathrooms, and closets without breaking or rusting like iron alternatives
8. Beautiful Cookware

Copper, enamel, and cast iron read as vintage even when they are new because the materials themselves age visibly.
A copper pot darkens to that brown-rust patina within weeks of real cooking, which is exactly what you want if you are after a kitchen that looks collected over years rather than ordered from a single catalog page last Tuesday.
The trick to arrangement is mixing the finishes so nothing matches too neatly. I hang copper beside matte black cast iron and let one enameled piece in a muted blue or cream break up the warmth.
Leave a gap between items rather than crowding them; the breathing room is what separates a working cook’s wall from a showroom display.
"Pretty much any object that is not made from plastic or doesn’t bear a corporate logo is fair game to display."
For a renter, this means your everyday pans can be the decor.
The skillet you actually seared salmon in last night carries more authenticity than any copper pot sourced from a market in Italy and never touched by heat. Let the use show.

【Decorative】 The kitchen utensil hanger comes in beautiful quality and color, simple and stylish, adding an elegant look to your space.

【HANGING POT RACK WITH ADJUSTABLE S HOOKS】The hanging pots and pans rack comes with 1 tube, 2 wall brackets, 1 connecting bracket, 8 S hooks and screws. ROTHLEY stylish and functional rod for hanging pots is designed to provide efficient storage and organization for your cooking essentials, bringing you a neat and tidy kitchen setting. The anti-drop s hooks are The sliding s hooks provided are secure on the rail, ensuring that your pots and pans stay securely in place

【HANGING POT RACK WITH ADJUSTABLE S HOOKS】The hanging pots and pans rack comes with 1 tube, 2 wall brackets, 1 connecting bracket, 8 S hooks and screws. ROTHLEY pots and pans hanging rack will bring you one a neat and tidy kitchen setting. You can adjust the distance between hooks, the sliding hooks won't fall and can be moved around for optimum placement.
9. Decanting Dry Foods
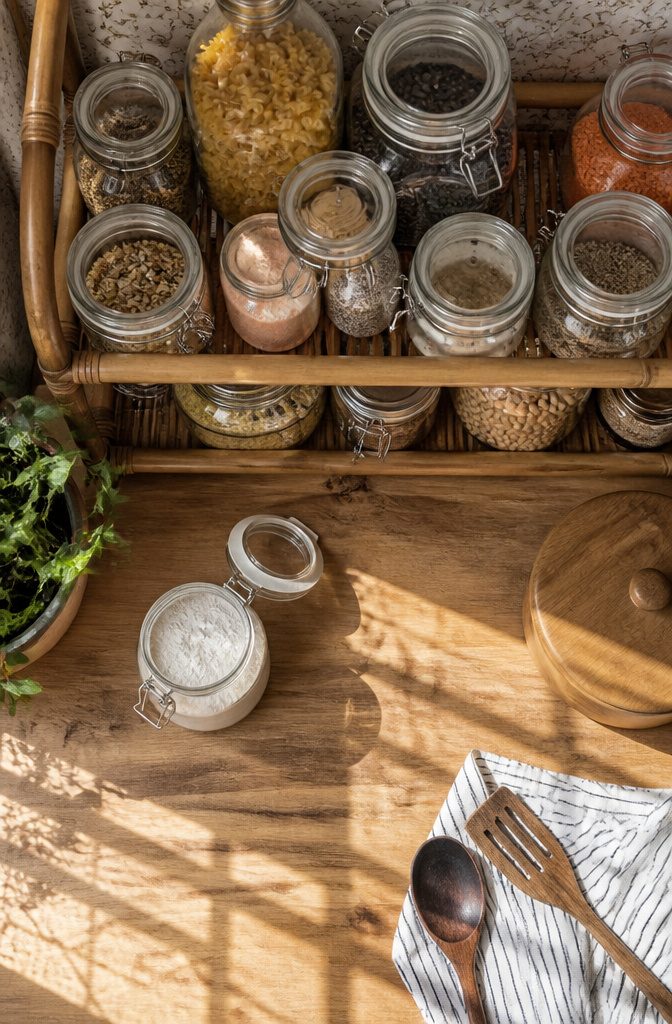
Uniform jars turn dry food into part of the display. Pasta shapes, dried beans, and grains bring in color and texture that read as vintage kitchenware even though they are ingredients you already buy.
Flour works too, though I keep it in a smaller jar and label it clearly, since a jar of white powder looks anonymous on a shelf.
Not everything earns a transfer.
Spices fade faster in clear glass, and anything in a foil-lined bag with a zip seal, like dried mushrooms or specialty baking mixes, stays put. The original packaging is doing a job that glass cannot.
For the jars themselves, mason jars from Amazon hit the apothecary look without the antique markup.
They read vintage because the shape is old, not because the glass is. A full set in one size looks intentional; mixing sizes works only if you group them by what they hold, not at random.

★【10 PCS OF FANCY PLAQUE COOKIE CUTTER SET】 - Stainless steel fancy plaque cookie DIY molds set, 10 different wedding frame blessing boxes shapes cookie cutting molds. Have fun to making cookie with families together

★【8 PCS OF FANCY PLAQUE COOKIE CUTTER SET】 - Stainless steel fancy plaque cookie DIY molds set, 8 different wedding frame blessing boxes shapes cookie cutting molds. Have fun to making cookie with families together.

Bake Art‑themed Sugar Cookies with Ease: Paint your world, and your treats, with this versatile paint‑palette cookie cutter. Perfect for an artist party, PYO (Paint‑Your‑Own) decorating events, or even creative golf green themed birthday parties.
10. Repurposed Antique Silverware

Vintage spoons flatten into cabinet handles with nothing more than a rubber mallet and a pair of pliers.
The bowl needs reshaping so it sits flush against the door, then you bend the handle to the angle that feels right in your grip.
Drill holes at either end with a bit rated for metal, and the hardware mounts in under an hour.
Silver tarnishes fast, and that is either the whole appeal or the thing you stop. A darkening patina against painted cabinets reads as found-object charm; on raw wood or crisp white, the same discoloration looks like neglect.
Clear-coat the piece if you want the bright finish to hold, though the coating adds a faint synthetic sheen that some find worse than the tarnish it prevents.
I leave mine bare and polish when the mood strikes, which is roughly twice a year in my kitchen.
Forks work better as wall hooks for tea towels, bent so the tines curve upward to catch the fabric. The tines pose a poking hazard as pulls, so I skip them for anything at waist height or below.

Large cooking Utensil Holder designed space saver for storing many items, Beautiful Burning finish for Farmhouse Kitchen Décor

【100% High-quality Bamboo Drawer Organizer】 Unlike other wooden drawer organizer, Bambloom drawer organizer is made of 100% bamboo (including the base of box) - solid structures, durable, beautiful and eco-friendly. The bamboo Utensil organizer is a perfect solution for organizing your messy drawer

Wipe clean with a damp cloth and dry by hand (do not soak)
11. Upcycled Coffee Mugs

A chipped mug still has life if the damage stays in the glaze.
Glaze-only chips are safe for plants or candles; cracks that run through the ceramic body let water seep and will split in freeze-thaw cycles, so those belong in the recycling bin.
For the survivors, drainage is the real problem. A coffee mug has no hole, which means most herbs and succulents will rot where the roots sit wet.
Pothos, snake plants, and spider plants tolerate that constraint better than most, since they prefer their soil to dry almost completely between waterings.
I would still add a half-inch layer of pebbles at the bottom so the root crown sits above any standing moisture.
For candles, the same chip rule applies, and the walls need real thickness. A thin thrift-store cup can crack from the heat concentration near the wick, so I pass on anything that feels lighter than a standard diner mug.
Soy wax poured at a lower temperature helps, but the vessel matters more than the wax choice. I keep these away from curtains and drafts; the charm is the display, not the drama.
12. Vintage Kitchen Tools as Decor

Vintage kitchen tools earn their place as decor when their shapes read as sculpture rather than clutter.
A wire egg beater or a ridged metal grater catches light in ways a flat spatula never will. Wooden spoons stored near the oven, as one maximalist kitchen shows, work because their rounded handles create rhythm against the wall.
Wall mounting suits the pieces with strong silhouettes: copper gelatin molds hung in a loose cluster, or a neat rod of copperware above the stove.
The hardware matters here. S-hooks on a utensil rail keep pots within reach and turn the rail itself into a horizontal line that anchors the display.
Shelf leaning, by contrast, favors tools that stand on their own. A potato masher with a chippy painted handle needs no bracket; its weight and shape hold the composition.
You sacrifice some access for visual impact.
Rails suit cooks who grab a ladle daily. Shelves or leaned arrangements work for the collector who rotates pieces seasonally.
For renters, leaning avoids holes entirely. For owners, a mounted rod above the cooktop ties to the room’s history in a way that reads intentional, not improvised.
13. Creative Use of Colanders
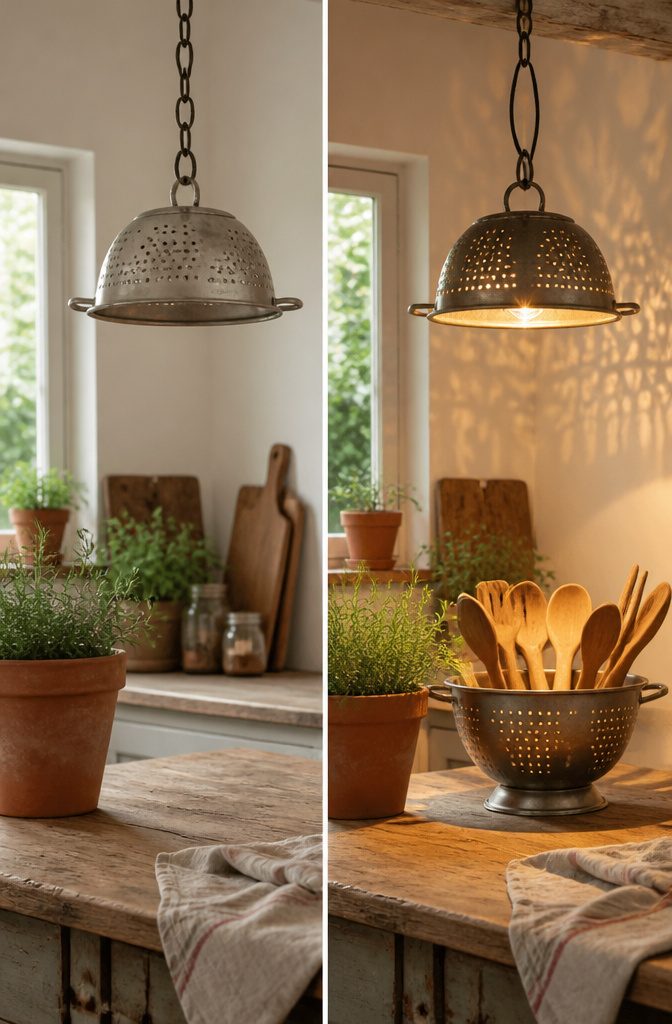
Colanders hang well because the perforated bowl already reads as a sieve of light.
Turn one upside down, thread a pendant cord through the center foot, and it becomes a shade that throws a spotted pattern across the ceiling after dark.
The holes give you something a full metal shade cannot: texture in the light itself, not just the object.
The cord and socket need to be rated for the bulb’s heat, even with LED run cool, and the colander’s weight sits entirely on that cord grip.
Most vintage aluminum colanders run under a pound, but anything hammered copper or iron needs a ceiling hook anchored to a joist, not a toggle bolt in drywall.
I would skip the enamel-coated ones here; chips near a heat source are not worth the risk.
As a planter, the drainage is built in. Line the bowl with moss and set a pot inside, or plant directly and accept the dry-out that comes with extra airflow.
The foot that once let a wet colander sit in a sink now creates a gap for air circulation, which most closed planters lack.
14. Tiered Trays from Kitchen Items

The best tiered trays start with a plate and cup that already feel like a set.
A fluted metal cake pan on top of a shallow ceramic plate gives you the ridged texture against something flat, and the weight of the metal keeps the whole thing from tipping when you load it.
I look for a cup or small bowl with a base wide enough to glue flat, about 3 inches across, since that contact patch is what keeps the tiers from wobbling.
For hardware, a wooden rolling pin or a short length of dowel works as the center post. Thrift stores usually have rolling pins with cracked handles or faded finish, so I grab those and cut them down.
A 6-inch post between tiers feels right for kitchen storage; taller and things disappear, shorter and you are bumping knuckles every time you reach.
What goes on the tray matters more than the tray itself. I skip the faux-vintage signs and seasonal figurines that turn this into a craft project.
Instead, a set of wooden spoons standing in a stoneware mug, a small glass jar of flake salt, and one potted herb reads as a working kitchen, not a display.
Rotate the herb out when it starts to look tired; the tray stays useful that way.
15. Framed Cookie Cutters

Vintage cookie cutters sit flat against glass in a standard frame, but a shadow box at least 1.5 to 2 inches deep keeps the handles from pressing the backing and lets light hit the metal from the side.
I arrange them in rows when the shapes share a theme, all animals or all holidays, because repetition reads as intentional collection rather than clutter.
For a mixed group, I sort by era or by metal type, copper with copper and tin with tin, so the finishes speak to each other even when the shapes do not.
The shadow box depth is the detail that decides whether the piece looks like art or like a drawer tipped open on the wall.
Repurposing Ideas

The line between a repurposed vintage piece and plain junk is thinner than most Pinterest boards suggest.
I’ve learned to watch for three details that decide which side a project lands on: the object’s original finish, how cleanly the new function is assigned, and whether the transformation required actual skill or just glue.
A tarnished spoon flattened with a rubber mallet and drilled to become a cabinet pull works because the metal keeps its history while doing a real job.
The same spoon bent crooked and screwed to a board as a "hook" looks like scrap because it fails at both tasks, neither displaying well nor hanging reliably.
Forks present the harder case, their tines posing what sources describe as a genuine poking hazard for handles, which is why I prefer them reshaped into napkin rings, a contained form where the tines become decorative rather than dangerous.
The vintage-to-trash threshold is structural damage you cannot sand, bend, or fill.
A chip in a teacup wall matters less than a crack through the base; the first holds a candle or a succulent, the second leaks soil or shatters with heat.
Colanders follow the same rule: surface rust paints away, but holes enlarged by corrosion won’t hold soil or diffuse light evenly.
I keep one test in mind, the piece should look like someone chose this form deliberately, not like someone ran out of other options.
Styling Techniques

Open shelving turns the question of how to style vintage kitchen utensils into something immediate. The wall becomes part of the working kitchen, not a storage closet you forget.
Dan Mazzarini’s own apartment runs an L-shape shelf that layers stemware, cookware, and even photographs underneath; the stuff you use every day earns its spot on display.
I like that approach because it keeps the vintage pieces honest. A utensil that looks good but never stirs anything feels staged.
The technique underneath matters more than the shelf itself.
Grouping by color keeps the eye from scattering across too many competing finishes. Wood cutting boards against vintage silverware against a glass milk container for spoons gives you three textures in one readable cluster.
Leave a gap between groups. Breathing room stops the collection from reading as clutter, which is the line this look always walks.
Magnetic strips and hanging hooks from custom cabinetry add function without adding noise. A knife on the wall or a mug on a vintage bottle rack reads as tool first, decor second.
That is the vintage sensibility working: the thing that does a job gets to stay visible because it does the job well.
Color and Texture

Color in vintage kitchen utensils follows a fairly predictable pattern. The pieces that read as genuinely period-appropriate lean toward muted enamel blues and greens, cream, or the occasional pop of red on handles and knobs.
Bright primary colors tend to feel retro rather than vintage, which is fine if that is the look you want, but the softer, more faded tones usually win for an authentic farmhouse or cottage feel.
Mixing metals is where most displays fall apart. Copper, stainless steel, and the occasional cast iron can coexist if you let one dominate and treat the others as accents.
A wire rack loaded mostly with copper, with one or two stainless pieces tucked in, carries the industrial energy without looking like a yard sale. The opposite, equal parts everything, just reads as cluttered.
Wood tones are simpler than people make them. Your utensil holder, cutting boards, and any mounted racks do not need to match.
Mango wood against a lighter oak or pine works because the contrast adds depth, but keep the finishes in the same family, matte with matte or oiled with oiled.
Two glossy varnishes in different colors will fight each other on the same counter.
Texture does the heavy lifting in a vintage display. A smooth ceramic vase holding wooden spoons gives the eye something to move between.
Wire racks against painted cabinets add grit. Without that variation, even the right colors go flat.
Frequently Asked Questions
How can I display my kitchen utensils?
Open shelving and decorative vases are two of the strongest options.
A wall-mounted L-shape shelf keeps pieces within reach while letting patina and wear add warmth to the room, and a wide-mouthed vintage vase with a heavy base turns everyday tools into countertop display.
What are some creative ways to repurpose kitchen items?
Flatten vintage spoons into cabinet handles with a rubber mallet and drill, bend forks into wall hooks for tea towels, or turn an upside-down colander into a pendant light shade by threading a cord through the center foot.
Each project works best when the original finish stays visible and the new function is clean and practical.
How do I create a vintage kitchen look?
Layer in pieces that show real use: copper pots with developing patina, wooden cutting boards in mixed sizes, and glassware grouped by faded color rather than by matched set.
Open shelving or glass-fronted cabinets keep these items visible and honest, part of a working kitchen rather than a staged one.
What are some effective ways to organize kitchen utensils?
Utensil rails with S-hooks beat pegboard for flexibility; you slide pieces left or right until the balance looks right, then swap items as seasons change.
For daily tools, a shallow 6-inch ledge keeps handles from jutting into workspace, while a vintage vase on the counter corrals spoons and spatulas where you grab them.
What is a vintage kitchen?
A vintage kitchen is defined less by era than by the presence of tools and materials that age visibly: copper that darkens, enamel that chips softly, wood that wears at handles.
The look depends on display choices that keep these pieces in use, open shelving and rails and glass-fronted cabinets rather than hidden storage.
Should I throw away black kitchen utensils?
Blackened copper or cast iron is often desirable patina, not damage. A copper pot darkens to brown-rust within weeks of real cooking, which is exactly the collected-over-years look vintage kitchens aim for.
Only discard pieces with structural failure: cracks through ceramic, holes enlarged by corrosion, or handles that no longer bear weight.
What should I do with old utensils?
The ones with strong silhouettes earn wall space on S-hooks or in shadow boxes; the ones you use daily belong in a vase or on a rail within arm’s reach.
For damaged pieces, flatten spoons into pulls, bend forks into hooks, or frame cookie cutters in a 1.5 to 2 inch deep shadow box so handles do not press the backing.